Monday, April 29, 2013

Oats Buttermilk Dosa A Super Tasty Healthy Breakfast


1 cup oats (I used quaker oats)1 1/4 cup rice flour1 cup curd/plain yogurtpinch of hing (asafoetida)4 finely chopped green chilli2 tbsp chopped coriander/cilantro1 tsp jeera (cummin seeds)1/4 tsp freshly crushed black pepperProcedure
Dry roast the oats in medium flame for few min until a nice aroma emanates,shift it to mixie and grind to fine powder. Mix all the above ingredients along with the oats powder and make it lump free smooth paste. Add water to make it have a flowy consistency.
Heat tawa on medium flame,add a tsp oil and pour 1/2 cup batter in a circle starting from the edge of tawa towards the center,add little oil around if needed .


Once the edges start to become golden brown flip it and increase the flame,let it roast for 1 minute or until lite crisp.Flip and fold the dosa .
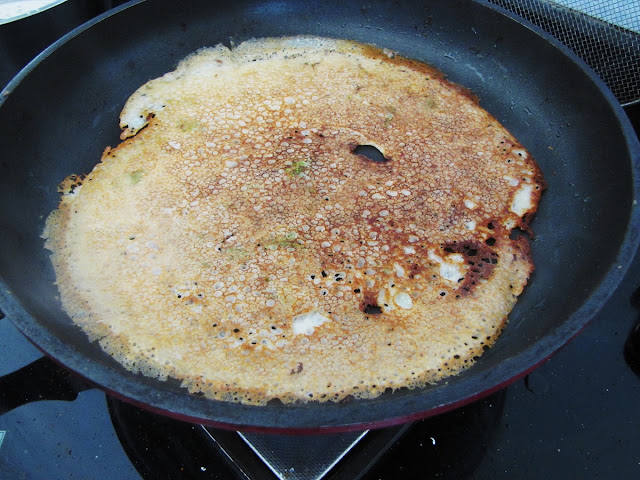
Serve hot with your choice of podi and chutney .I love to serve this yummy dosa with sesame tomato chutney.

The Aromatic and Heavenly Pull-Apart Pesto Rolls

for Pesto
1 1/2 cup packed basil leaves1/4 cup olive oil1/4 cup parmesan cheese1/4 cup chopped walnuts2 green chillies3 garlic pods1/4 tsp saltProcedure:
Add all the above ingredients and make a rough paste,your pesto is ready to use .

Ingredients for rolls ( 2 sets )2 cups all purpose flour3/4 cup warm milk2 tbsp melted butter2 tbsp sugar1.5 tsp instant yeast1/2 tsp salt1/4 cup grated mozzarella cheese In a big bowl add yeast,sugar,salt n warm milk let it sit for 10 min. It will become foamy. Then add butter mix nicely. Then add flour slowly 1/2 cup at a time n stir with spatula. Then take it out of the bowl n on a lightly floured surface knead it for 5 min n then make it into a ball. Grease it with oil then put it in a bowl n cover with a damp cloth n let it sit for 1 hr.

The dough size will double after 1 hr, knead it again nicely and divide it into two parts and spread it with a roller like chapatti with 2mm thickness and apply pesto sauce equally and sprinkle mozzarella cheese evenly. Then roll it and cut into 1 inch thick swirls. Let is rest for 20 minutes.

Preheat the oven for 180 Celsius. Bake the roll for 30-40 min till golden brown. Remove the baking tray and brush all the rolls quickly with butter ,let it cool. 

Pistachio Rosewater Cupcakes With A Pink Frosting

  
1 cup all purpose flour3 tbsp pista powder1 egg1/2 cup powder sugar or confectionary sugar1 1/2 tsp baking powder3tbsp butter at room temp3/4 cup milk1/4 tsp vanilla extract2 tbsp rose water pinch of saltPreheat the oven to 170 Centigrade.

Take a large bowl sieve the all purpose flour, pista powder,sugar, baking power and salt all together.
Then rub the butter with this flour nicely and keep aside.

In another bowl beat the eggs and milk for 3 min with a hand blender with medium speed till it become fluffy.Then add vanilla extract,rose water and again blend till it all mix nicely.  


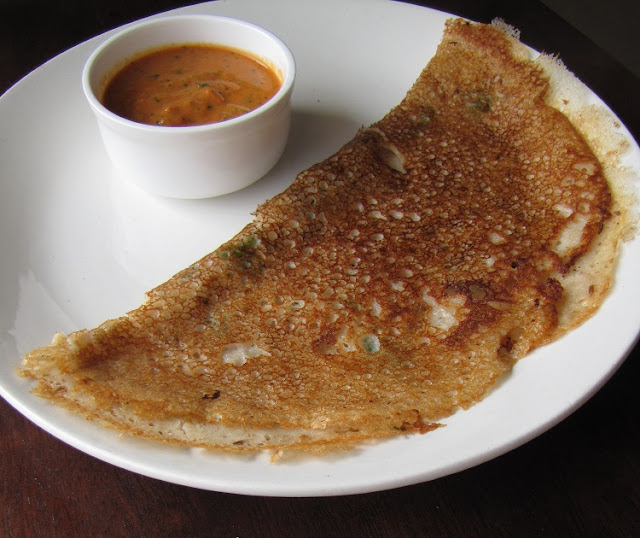
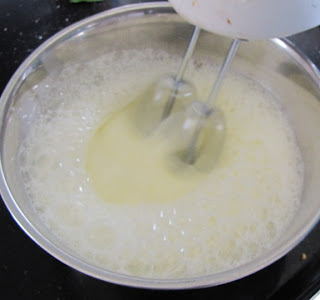
 To the above egg mixture add the dry ingredients and stir till it blends properly .This can done with hand blender or even with a spatula.


Take 12 muffin cups, spray some oil n pour 1/2 batter each cup.Then place this tray in the microwave and let it bake for 20-25 min.

You cup cakes are ready.

To prepare the frosting1 cup heavy whipped cream ( I used nilgiris cream)2 tbsp confectionary sugar2 tbsp iceing suagar1/2 tsp rose water1/4 tspvanilla extract1-2 drops of food colorChill a large and medium size bowl with spatula,beater spiral in refrigerator for 15 min

Once the tools are chilled take the large bowl and fill with 1/4 level ice cubes. Place a medium size bowl on top of it. 

Empty the cream into it and start beating in a low speed until it becomes fluffy  and the cream forms light peaks..

Add sugar and beat again, then add the icing sugar, rose water, vanilla and beat till it forms thick peaks.

Then add a natural food color of pink shade and blend again. Store it in a bowl and cover with cling wrap and refrigerate and use it after 20 minutes.
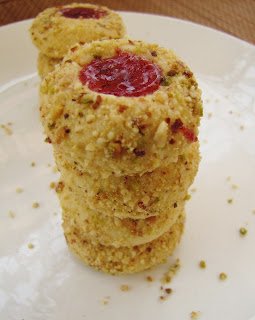
 Fill the piping bag with the frost with your choice of nozzle and frost each cupcake, sprinkle some chopped pistachio on each frosted cupcake for the final touch and serve.

Fresh Steamed Oyster Mushroom Dim Sum

for wrap
1 cup maida/all purpose flour1/8 tsp saltwater to mixMix the maida and salt and then water slowly and mix and knead it with your hands to make it a firm stiff dough.Let is sit for half hour. In the meantime prepare the stuffing
Ingredients for stuffing2 cup chopped oyster mushrooms1/2 cup chopped onions1/2 cup chopped bell pepper1/2 cup chopped cabbage1 tbsp chopped garlic1 tsp soya sauce1-2 chopped green chillies1/4 tsp pepper powder or to taste1/4 tsp oregano(optional)a pinch of ajinomoto ( optional )salt to taste1 tbsp oilProcedure

Heat oil in a non-stick pan ,add garlic and onion and fry till it become translucent then add bell pepper,cabbage and mushrooms and fry for 5 min or till all the water of mushroom evaporate,cook them in high flame quickly as it will ensure that the water evaporate and veggies are still crunchy.

Add the oregano,soya sauce,salt, pepper and ajinomoto and stir quickly and switch it off  and let it cool.
Divide the dough into small lemon size ball and with a sprinkle of flour , roll them with a rolling pin to approximately 3 inch diameter and as thin as possible and cut with 3 inch diameter cookie cutter to get good round shape.

Now you are ready for assembly

Take one tbsp of filling and put in the middle and close to bring the two edges close to each other .

Close one corner and then make a small fold on one edge and press move towards the other edge and seal. Continue making these small folds on one side and press to seal with the other edge.Your dim sum wrap with the filling is ready.

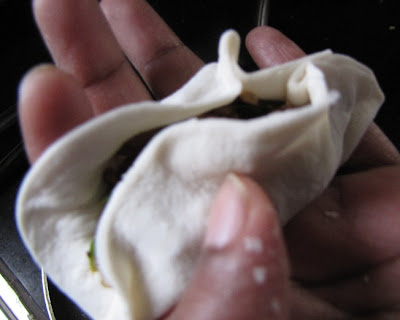
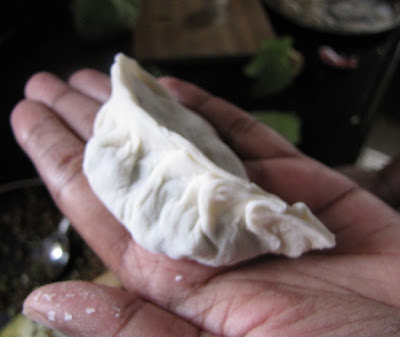
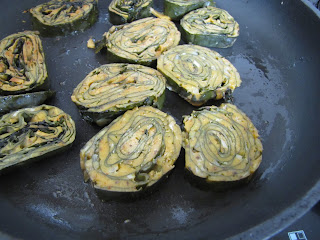
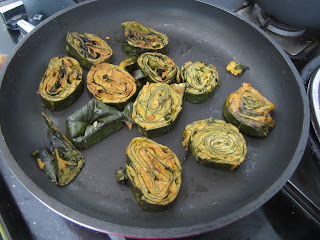
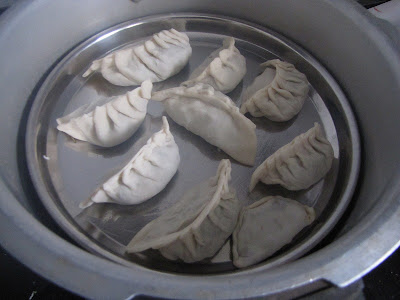
Grease a large plate with some oil and place all the dim sums on it and cover with damp cloth , then steam them in a pressure cooker or steamer for 5-6 minutes and the dim sums will have a shiny silvery glow. Immediately shift to a hot pack.

Serve these warm dim sum with sweet chilli sauce to get the authentic experience

Sunday, April 28, 2013

The Magical Process Of Storing Green Peas

1.5 kg green peas pods1 medium size ziploc for storageProcedure

Split and extract the peas and keep in bowl  
Take a large bowl and fill 3/4 th with water and boil it.

Once it starts boiling reduce the flame and add the green peas.

 It will settle in bottom initially and it will start to float slowly. 
 
Once all the peas float scoop them and dry them on a cloth.This process will take 1-2 minutes. 

Store in a medium size ziploc and keep in freezer.


Savory Patra For A Special Evening Snack

:
2 cups chickpea flour1/2 finely chopped onions1 tbsp chopped green chillies4 tbsp chopped coriander/cilantro1/4 tsp garam masala1 tbsp chopped garlic2-3 tsp lemon juide1 tsp chilli powdersalt to tasteProcedure
Clean the leaves and mix all the ingredient and make a smooth thick paste and keep aside.
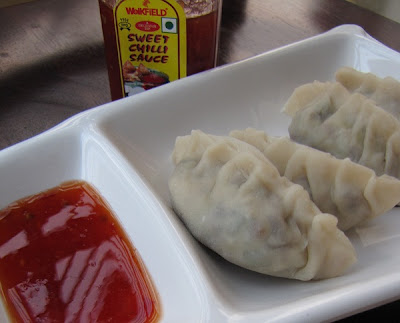
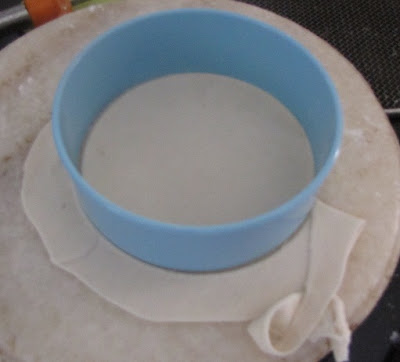
  Reverse and flatten the taro leaves and remove the center vein lightly.

Take a lump of paste and spread evenly over the leaf, put another leaf on the top and continue the same with three leaves. 
Then roll the leaf from the pointed side until the other end and finally close the two ends and steam for 10 minutes.         
Once cooled cut them into one cm thick rolls and shallow fry with tsp oil until light golden brown and crispy.

Serve hot

Saturday, April 27, 2013

Delicious Eggless Thumbprint Jam Cookies

1/2 cup cooking butter1/4 cup superfine sugar1/4 cup maida / all purpose flour2 tbsp milk1/2 tsp vanilla essence1/4 cup of dry fruits mixture2 tbsp jam of your choice (I used mixed fruit jam)
Procedure
Dry roast the almond, pistachio, cashewnut and make a rough grained powder.

Beat the jam with the spoon until it becomes a smooth consistency and keep aside

Beat the butter and superfine sugar (powered sugar) and mix the vanilla essence and milk to it,then add the all purpose flour and mix nicely with a spatula and then with your hands into a soft lump , cover the dough with a cling wrap and refridgerate for 10 min

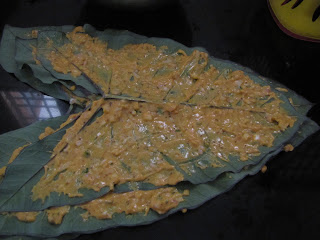
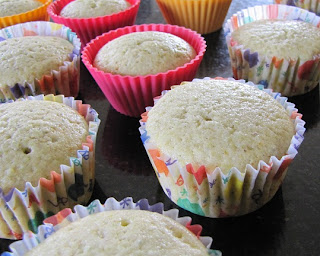
Preheat the oven for 180 degrees

After 10 min divide the dough into small lemon size balls. Roll the balls on the dry fruit mixture  then remove and press softly and make a small thumbprint in the center and fill with 1/4 tsp jam and place on a greased metal tray

Bake them for 30 minutes until they begin to turn golden brown .

Enjoy your cookies

Friday, April 26, 2013

lobster bisque

lobster bisque


Yield: 6 servings
Prep Time: 20 min
Cook Time: 30 min

Ingredients:

3 tablespoons salted butter
1/2 cup minced shallots
4 cups low-sodium chicken broth
1 bay leaf
1 teaspoon chopped fresh thyme
3 tablespoons all-purpose flour
2 tablespoons tomato paste
3/4 cup white wine
1 pound cooked lobster meat, chopped
1 1/2 cups half and half cream
1 tablespoon cognac (optional)
additional, larger pieces of lobster meat, for garnish
chopped chives, for garnish (optional)

Directions:

1. Melt the butter in large saucepan over low heat, and sauté the shallots until tender.
2. Meanwhile, bring the broth, bay leaf, and thyme to a boil in another saucepan.
3. Whisk the flour into the shallot mixture, cook, stirring 1-2 minutes. Stir in the tomato paste; slowly whisk in the boiling broth. Gradually add wine; simmer 10 minutes; stirring occasionally.
4. Add the lobster meat and soup into a food processor and blend. Return the mixture to the saucepan, stir in half and half, then cognac. Heat through.
5. Garnish with lobster and serve.

Tips:

*To make this soup gluten-free, be sure to use a brand of broth that is known to be GF, and use a substitute for the all-purpose flour- such as GF All Purpose, cornstarch or another GF thickening agent.

Seafood Spaghetti Recipe

Seafood Spaghetti Recipe
Yield: 4 servings
Prep Time: 10 min           
Cook Time: 10 min

Looking for the best spaghetti recipe?Here is one of the best spaghetti recipes-seafood spaghetti,which include many seafood products,such as shrimps,mussels,clams.


Ingredients:

  • 12 oz(450g) spaghetti
  • salt and freshly ground black pepper
  • 1 garlic clove
  • 3 tablespoons olive or vegetable oil
  • 10 oz(280g) can of baby clams or mussels
  • 8 oz(225g) large shelled shrimps
  • 8 oz(227g) can of tomatoes
  • 1 tablespoon chopped parsley

Directions:

Cook spaghetti in boiling salted water till tender.Meanwhile,peel and crush garlic.Heat oil in a large saucepan,add garlic and fry for 1 minute.Add shrimp and fry,stirring,for 2-3 minutes.
Drain clams and mussels and add to pan with tomatoes and their juice and seasoning.Cook for about 3 minutes,stirring to break up tomatoes.Drain spaghetti thoroughly.Add to seafood sauce with parsley and toss lightly over a low heat till well coated.Serve seafood spaghetti immediately.

Thursday, April 25, 2013

strawberry- coconut cheesecake


strawberry- coconut cheesecake


Yield: 12 servings
Prep Time: 40 min + chill time
Cook Time: 1 hr, 50 min
I prepared this cheesecake and entered it into the cheesecake contest at the San Diego County Fair. I got second place! The filling is a creamy coconut flavor with a touch of strawberry on top. Rich and delicious!!

Ingredients:

CRUST:
6 Tablespoons unsalted butter, melted- divided
3/4 cup graham cracker crumbs
1/2 cup unsweetened shredded coconut, toasted and cooled
1/4 cup granulated white sugar
FILLING:
3 (8-ounce) packages cream cheese, at room temperature
1 cup granulated white sugar
1/4 cup unsalted butter, at room temperature
3 Tablespoon cornstarch
4 large eggs
1 cup canned sweetened cream of coconut (such as Coco Lopez)
1/4 cup coconut rum (such as Malibu)
1 1/2 teaspoons coconut extract
TOPPING:
1/4 cup seedless strawberry jam
2 Tablespoons water
3 (1-pint) containers strawberries, stemmed and sliced

Directions:

1. Prepare crust: Preheat oven to 350°F. Brush 9-inch diameter springform pan with 2-inch sides with 1 Tablespoon melted butter. Blend crumbs, coconut, sugar, and remaining butter in medium bowl. Press mixture over bottom of prepared pan. Bake crust until lightly browned at edges, about 10 minutes. Cool. Reduce oven temperature to 300°F.
2. Prepare filling: Using electric mixer, beat 1st four ingredients in a large bowl until blended. Beat in eggs 1 at a time. Beat in cream of coconut, rum and coconut extract. Pour batter over crust. Lay out 2 layers of heavy duty foil; set cake pan on top of the foil and lift into a large roasting pan. Fold sides up to create a "bowl" with the foil. Add enough water to the roasting pan to come 1 inch up the sides of the cake pan. Cover roasting pan with foil.
3. Bake cake in roasting pan for 1 hour. Remove foil. Bake until cake is pale brown, puffed and just set in the center, about 40 minutes. Set your pan on your cool stove and cool in the water bath for 2 hours. Remove from water; gently remove sides of springform pan. Chill cake for 3 hours. This part may be made 2 days ahead. Cover and keep chilled.
4. On the day of serving- prepare topping: Simmer jam and 2 Tablespoons water in small saucepan. Brush top of cake with warm jam. Overlap berries atop cake, covering completely. Brush remaining jam over berries; chill until ready to serve.

Tips:

*It's okay to use sweetened coconut if you are unable to find unsweetened.
*Cream of coconut can be found in the liquor department of your grocery store, or at liquor stores.

candy cane coffee cake


candy cane coffee cake


Yield: 3 coffee cakes (12 servings each)
Prep Time: 45 min + rising time
Cook Time: 15 min
I've made these for a holiday brunch and they're always a big hit. Guests think they're adorable, and it's really quite delicious too.

Ingredients:

FILLING:
12 ounce package frozen raspberries, sweetened
1/8 teaspoon ground cardamom
1/4 teaspoon almond extract
2 teaspoons cornstarch
CAKE:
2 packages active dry yeast(or 4 1/2 teaspoons)
1/2 cup water, warmed to 105 to 115 degrees
1 1/4 cups buttermilk
2 large eggs
5 1/2 to 6 cups bread flour
1/2 cup butter, softened
1/2 cup granulated white sugar
2 teaspoons baking powder
2 teaspoons salt
GLAZE:
3 cups powdered sugar, sifted
3 teaspoons almond extract
9 teaspoons water

Directions:

1. Prepare filling: Place all filling ingredients in saucepan. Heat until raspberries 'melt,' and stir until slightly thickened. Remove from heat. It will thicken a little bit more upon cooling.
2. Prepare cake: Dissolve yeast in warm water in large bowl. Add buttermilk, sugar, butter, eggs, baking powder, salt and 2 1/2 cups of the flour. Beat with electric mixer on low speed 30 seconds, scraping bowl constantly. Beat on medium speed for 2 minutes, scraping bowl occasionally. Stir in enough remaining flour to make dough easy to handle. (Dough should be soft and slightly sticky.)
3. Grease 3 cookies sheets. Turn dough onto parchment paper that has been sprinkled with flour; gently knead about 5 minutes or until smooth and elastic (Or you can use a stand mixer with a dough hook to do the kneading for you). Divide dough into 3 equal parts (should be a little over a pound each). Roll one part into rectangle, 15x9-inches. Turn parchment paper onto a cookie sheet and peel away the parchment. Spread 1/3 of the raspberry filling in a strip about 2 1/2 inches wide lengthwise down the center of the rectangle. Make cuts in dough at 1/2-inch intervals on both 15-inch sides almost to the filling. Fold strips over filling, overlapping and crossing in center (crisscross back and forth).
4. Carefully stretch dough until about 22 inches long; curve one end to form top of cane. The dough is very forgiving and easy to work with, so just gently move it around to get the look that you want.
5. Repeat preparations with 2 remaining balls of dough.
6. Cover and let rise in warm place for about an hour (or until double). The dough is ready if an indentation remains when touched.
7. Preheat oven to 375°F. Bake 13 to 17 minutes (or until lightly browned and slightly firm to touch). Prepare 1 recipe of glaze at a time... whisk together 1 cup of powdered sugar, 1 teaspoon extract and 3 teaspoons water and pour into a small zip baggie. Snip off a corner and squeeze to drizzle glaze onto one of the warm cakes. Follow the design of the weave for the best look.
8. Let set for at least half an hour. Wrap festive bow around longer part of the cake. Ready to serve!

Tips:

*If your frozen raspberries are not sweetened, toss them with 1 Tablespoon of granulated white sugar.
*Make ahead: These cakes can be partially prepared the night before. Prepare until the point just before you let them rise. Cover the cookie sheets well with plastic wrap and store in the refrigerator. Unwrap in the morning, let them sit at room temperature for about a half hour and then cover and continue with the recipe... let rise, etc.
*To simulate a warm place to rise, turn your oven on to 500 degrees F. for one minute. Turn on the oven light too. Turn off the heat after a minute and place your cake in the slightly warmed oven for rising. Don't forget to turn the oven off!

broiled fish tacos


broiled fish tacos

Yield: 4 servings (2 tacos per serving)
Prep Time: 25 min + marinating time
Cook Time: 10 min
A healthy, simple version of Southern California's favorite taco...

Ingredients:

1 1/2 pounds red snapper filets, rinsed & patted dry
5 Tablespoons canola oil
1 teaspoon cumin
1 teaspoon chili powder
3 Tablespoons lime juice, freshly squeezed
8 soft corn tortillas, wrapped in foil
kosher salt & freshly ground black pepper
2 cups guacamole, purchased or homemade
2 cups shredded iceberg lettuce
2 cups fresh salsa, purchased or homemade
3 whole green onions, chopped
1/4 cup chopped cilantro
2 limes, cut into wedges

Directions:

1. Place fish fillets in a glass dish. In a small bowl, whisk together oil, cumin, chili powder and lime juice; pour over the fish. Cover with plastic wrap and let sit at room temperature for about 15 minutes.
2. Preheat oven to broil setting (or highest baking temperature). Place foil-wrapped tortillas on the bottom rack.Spray a broiler pan with nonstick spray. Remove fish from marinade and place on the broiler pan. Broil 3 inches from the heat source. Broil 7 to 12 minutes on one side only, keeping an eye on the fish to make sure it doesn't burn. It's cooked all the way through when the fish flakes apart easily. Transfer to a cutting board and flake apart into chunks. Remove tortillas from the oven.
3. Assemble the tacos: Place a tortilla on a work surface. Smear a heaping Tablespoon of guacamole over the top of the tortilla. Add a few shreds of lettuce, several chunks of fish, a spoonful of salsa, a sprinkle of green onions and about 1/2 Tablespoon of cilantro.
4. Serve immediately, with lime wedges for squeezing.

Tips:

*If preparing this recipe as GLUTEN FREE, just be sure to use a brand of corn tortillas that are known to be GF.

Tuesday, April 23, 2013

pumpkin cinnamon rolls w/ maple icing


pumpkin cinnamon rolls w/ maple icing


Yield: 12 cinnamon rolls
Prep Time: 50 min + rising time
Cook Time: 30 min
These cinnamon rolls from the Food Porn Daily cookbook are perfect for a Thanksgiving breakfast or any fall weekend. Our family thought they were pretty droolworthy. There are quite a few steps in this recipe but don't be afraid... the result is so worth the effort you'll put into making these!

Ingredients:

DOUGH:
4 Tablespoons salted butter, melted
1/4 cup granulated white sugar
1/2 teaspoon salt
1 cup canned (unsweetened) pumpkin puree
1 large egg, beaten
1/2 cup lukewarm water (105 – 110 degrees F)
1 packet active dry yeast
1 Tablespoon granulated white sugar
3 3/4 cups all-purpose flour, plus extra- as needed
cooking spray
FILLING:
4 Tablespoons butter, at room temperature
2/3 cup light brown sugar
1 Tablespoon ground cinnamon
1/4 teaspoon ground cloves
1 teaspoon ground ginger
1/8 teaspoon ground allspice
1/8 teaspoon ground nutmeg
1/4 teaspoon salt
ICING:
3 ounces cream cheese, at room temperature
1 cup powdered sugar, sifted
1/4 cup pure grade B maple syrup
1/4 teaspoon salt

Directions:

1. Spray a non-reactive bowl with nonstick spray. Set aside. Line a 13x9x2-inch metal baking pan with parchment paper.
2. In a mixing bowl, whisk together first 5 ingredients of the dough (through egg) until well combined. Set aside.
3. In a small bowl, whisk together warm water, yeast and 1 Tablespoon sugar. Let sit for 5 minutes until the yeast is frothy and active. If after 5 minutes yeast does not appear active, discard the mixture and start over with a newer, fresher yeast packet.
4. Place flour in a large mixing bowl (or the bowl of a stand mixer). Add yeast mixture and pumpkin mixture to the flour. Stir until ingredients have incorporated into a dough. If using a stand mixer, attach a dough hook and knead on medium speed for 5 minutes. If kneading by hand, turn dough out onto a clean, lightly floured surface and knead for 8 to 10 minutes. The desired consistency of the dough should be soft and just slightly sticky. Add more flour as necessary throughout the kneading process until you achieve the proper consistency.
5. Form dough into a ball and transfer to the oiled bowl. Toss dough around in the bowl to coat all sides lightly with oil. Cover with oiled plastic wrap and a kitchen towel. Place in a warm, draft-free spot. Let the dough rise until nearly doubled, usually 1 to 1 1/2 hours.
6. Roll dough into a 16x10-inch rectangle on a large, lightly floured piece of parchment or waxed paper. While rolling out the dough, make sure it’s not sticking to the surface. Lift the dough and sprinkle flour underneath, as needed.
7. Spread a thin layer of butter over the dough, leaving a 1/2-inch border on all sides. In a small bowl, whisk together remaining filling ingredients. Sprinkle this mixture evenly over the butter. Roll dough into a tight spiral- jelly roll style- by rolling the 16-inch long edge closest to you over the filling. Continue rolling dough into a log until the opposite edge is on the bottom. Slice dough into 12 even pieces and arrange in the prepared baking dish cut-side up. Cover the pan with oiled plastic wrap and a kitchen towel. Let rolls rise for 30 minutes in a warm, draft-free area. They’ll get puffy and smash into each other as they rise. Preheat oven to 350 degrees F.
8. Remove towel and plastic wrap. Bake until tops and edges are golden and rolls are cooked through- 30 to 35 minutes. Remove from oven and place on a wire rack to cool for at least 20 minutes before icing.
9. Place a baking sheet over the dish of cinnamon rolls. Invert rolls onto the baking sheet and peel away parchment paper. Flip the rolls onto your choice of serving dish. Whisk together the icing ingredients until smooth, then spoon evenly over all of the cinnamon rolls, allowing it to dribble down the sides.

Tips:

*To create a warm, draft-free place for rising, use your oven… turn on the oven for 30 seconds, then turn it off, turn the light on, and place your bowl inside the very slightly warmed oven. It’s a great place for your dough to rise if your oven is not in use.
*Make-ahead tip: Once your cut cinnamon rolls are in the pan, you can wrap them with plastic wrap at this point and refrigerate them overnight. Take them out of the fridge and let them warm up in the morning (at room temperature) and do their rising. Then you can continue with baking.
*These are best the day they’re made, but they’re also good re-heated the following day.
*Cinnamon rolls store better when they’re kept together since the edges will dry out if separated.

hot fudge mint brownie sundaes


hot fudge mint brownie sundaes

Yield: About 24 regular-sized "muffins" (but shorter than your average muffin)
Prep Time: 15 min
Cook Time: 10 min
These little mint brownie "muffins" are perfect for topping with ice cream and chocolate sauce.

Ingredients:

1 1/2 cups semi-sweet chocolate chips, divided
1 3/4 cups all-purpose flour
1/2 teaspoon baking soda
1/2 teaspoon salt
1/2 cup (1 stick) unsalted butter, at room temperature
1/2 cup granulated white sugar
1/4 cup light brown sugar (packed)
1 teaspoon peppermint extract
1/2 teaspoon vanilla extract
2 large eggs
ice cream
hot fudge

Directions:

1. Preheat oven to 350 degrees F. If you wish to make these into muffins, lightly grease muffin tins. You can also bake them on baking sheets lined with parchment paper, or lightly greased.
2. In a glass dish, microwave 3/4 cup of chocolate chips for 1 minute; stir and then microwave an additional minute; stir again. If chips aren't completely melted, heat in 20 second bursts until they are melted and smooth. (You can also do this in a pan over low heat on the stove). Let cool.
3. In a medium bowl, whisk together flour, baking soda, and salt.
4. In a large bowl, use electric mixer to cream together butter with sugars. Add in extracts and eggs. Beat in cooled chocolate. Gradually add dry ingredients and beat until incorporated. Stir in remaining chocolate chips. Scoop into muffin tins (just a heaping Tablespoon per muffin) or onto cookie sheets.
5. Bake for 8 to 12 minutes, until sides seem set but centers are still soft. If you intend to use them for sundaes, you want them on the softer, gooey-er side- so bake them less. Let cool on wire racks and serve as soon as you'd like. For sundaes, they're best served warm, with a scoop of ice cream and a drizzle of hot fudge.

Tips:

*If you don't care for mint, use all vanilla extract to make regular brownie muffins and top with your favorite ice cream.

frozen caramel- toffee ice cream sandwich dessert


frozen caramel- toffee ice cream sandwich dessert

Yield: One GIANT dessert
Prep Time: 25 min + freezing time
This easy, frozen dessert recipe is a family favorite. It's best to serve at a large gathering, where you can dish out the majority of it (plus seconds) in a short time, but it also keeps well in the freezer for about a week. Just cut off a chunk when the craving hits!

Ingredients:

deep-dish rectangular, throw-away foil pan (9x13)
24 store-bought frozen ice cream sandwiches
2 regular-sized tubs of Cool Whip
caramel sauce
chocolate sauce
bag of Heath bits
4 bars Heath or Skor candy bars, chopped

Directions:

1. Spray pan with cooking spray. Layer 12 ice cream sandwiches side-by-side in bottom of pan.
2. Spread one tub of Cool Whip over the top of the sandwiches. Drizzle caramel and chocolate syrups over the top of the Cool Whip and then sprinkle with toffee bits. Place in the freezer for about an hour.
3. Layer 2nd level of 12 ice cream sandwiches on top of the toffee bits. Spread with 2nd tub of Cool Whip. Drizzle caramel and chocolate syrup over the Cool Whip. Sprinkle Skor/Heath bars over the top. Place in freezer for several hours until firm.
4. When ready to serve, remove from freezer and use sharp knife to cut into squares.

Tips:

*For an outdoor gathering, we found this was easiest to eat when cut into squares and served in cups. Place a bunch on a tray for simple serving.
*Warning! This recipe makes a LOT. It keeps well in the freezer for several days. Make it only when you have a large gathering planned, or cut the recipe in half.
*It is suggested that you use the pan indicated in the recipe since you need to have a pan that is deeper than normal. If you have a deep pan alternative, go ahead and try that one (you'll need about 4 to 5 inches of depth to be safe).

fresh cherry turnovers


fresh cherry turnovers

Yield: 9 turnovers
Prep Time: 40 min + chilling time
Cook Time: 25 min

Ingredients:

CREAM CHEESE CRUST:
1 1/2 cups all-purpose flour
1 teaspoon granulated white sugar
pinch of salt
1/2 cup (1 stick) cold, unsalted butter, cut into 1/2-inch pieces
1 (8 ounce) package of cold cream cheese, roughly cut into tablespoons
CHERRY FILLING:
2 1/2 cups pitted & halved fresh cherries (about 3/4 pound)
2 Tablespoons granulated white sugar
1 Tablespoon finely grated lemon zest
1 Tablespoon fresh lemon juice
1 Tablespoon cornstarch
1/4 teaspoon salt
EGG WASH:
1 large egg yolk
2 Tablespoons milk or cream
TOP:
coarse grain sugar

Directions:

1. Prepare crust: Place the flour, sugar and salt in the bowl of a food processor and process for 10 seconds to blend. Add the cold butter pieces and process for just a few seconds, until the mixture looks like crumbs. Add the cream cheese and pulse quickly about 25 times (or until a clump of dough has formed). Turn the clump of dough onto waxed paper and knead gently 2 to 3 times to bring dough together. Flatten into a 7-inch square. Wrap with plastic wrap and chill for at least 30 minutes (or up to 2 days).
2. Prepare filling: Mix cherries with sugar, lemon zest & juice, cornstarch and salt; set aside until ready to fill the turnovers.
3. Place the dough on a lightly floured surface.. Roll into a square that is roughly 15x15. At this point, you can decide if you'd like to make round or square-shaped turnovers. If you make round (half-moon shape) turnovers, you can simply use the top of a 6-inch diameter bowl as your cutter. If you'd rather make square (triangle-shape) turnovers, use a chef's knife to trim a 15-inch square. Mark 5-inch increments along all sides of the dough & with the ruler as a guide, cut the dough into nine 5-inch squares. Re-roll scraps as necessary.
4. Line two rimmed baking sheets with parchment paper or silicone baking mats.
5. Assemble Turnovers: Place cut-out dough onto prepared baking sheets. On each square or circle, use a knife to lightly mark a line showing the halfway mark (make sure it's just a line indentation & not cut all the way through). Spoon a couple of Tablespoonfuls of the cherries onto each "half"- keeping it on one side of the dividing line and leaving about a 1/4-inch border along the edge. Brush edges on the fruit side of the turnover with egg wash (egg & milk whisked together). Carefully fold the other side over the fruit and use the tines of a fork to press the edges together and seal them. Move baking sheets to refrigerator and chill for about 20 minutes. Adjust racks in oven to top and bottom thirds of the oven, and preheat oven to 375°F.
6. Bake Turnovers: Brush the tops of the turnovers with egg wash and sprinkle with coarse sugar. Use the tip of a paring knife to carefully cut three slits in the top of each turnover to allow steam to escape during baking. Bake turnovers on bottom and top third racks for 15 minutes. Then rotate the sheets and bake for an additional 10 to 15 minutes, or until the crust is golden brown. Transfer to a cooling rack to cool completely. Serve warm or at room temperature, with whipped cream or vanilla ice cream.

Tips:

*The dough may also be frozen. Wrap in plastic wrap and place in zip freezer bag for up to 2 months.
*These will keep at room temperature in a covered container for 2 days. To re-crisp, heat in a 375 degree oven until warmed through. They'll keep a little longer if wrapped airtight and refrigerated (about 5 days).

french toast


french toast

Yield: 6 servings
Prep Time: 10 min
Cook Time: 10 min

Ingredients:

4 large eggs
1 cup store-bought egg nog
2 Tablespoons spiced rum (optional) or 1 tablespoon vanilla extract
1/2 teaspoon pumpkin pie spice (or 1/4 teaspoon cinnamon + 1/4 teaspoon nutmeg)
12 slices bread (I prefer French bread or Challah)
butter, for frying

Directions:

1. In a low bowl, whisk together eggs, nog, rum (if using) and spices.
2. Preheat griddle. Dip bread in egg mixture, allowing it to soak in slightly. Butter the hot griddle and place soaked bread on griddle. Cook on each side until golden brown. Serve with butter and powdered sugar and/or syrup.

Tips:

*This recipe can be easily halved.
*Also great served with Creamy Egg Nog Syrup from Dine and Dish blog.

dulce de leche pumpkin- toffee pie


dulce de leche pumpkin- toffee pie

Yield: 1 deep-dish pie
Prep Time: 25 min
Cook Time: 50 min
This is a really good and RICH pie!

Ingredients:

1 deep dish pie crust (frozen or make your own)
3/4 cup canned dulce de leche (about- maybe a little less)
2 large eggs
One 15-ounce can of pure pumpkin puree (not pumpkin-pie filling)
1 cup firmly packed brown sugar
2 Tablespoons all-purpose flour
1 Tablespoon pure vanilla extract
1/2 teaspoon salt
1 teaspoon ground cinnamon
3/4 teaspoon ground ginger
1/4 teaspoon ground nutmeg
One 12-ounce can evaporated milk
whipped cream and toffee bits for garnish, if desired

Directions:

1. Preheat oven to 375°F. Place rack on bottom.
2. Press pie crust into a deep-dish pie pan (or remove frozen pie crust from freezer).
3. Scoop dulce de leche into glass bowl and microwave about 20 seconds to soften it up a bit. Spoon dollops of dulce de leche into the pie crust. Evenly spread the caramel all the way to the edges.
4. Whisk eggs in a medium bowl. Whisk in pumpkin and next 7 ingredients until smooth. Whisk in milk. Pour filling on top of the caramel and place pan on a baking sheet to catch any caramel that may bubble out.
5. Bake on bottom oven rack for about 50 minutes (center should jiggle just slightly). Cool completely. Garnish with whipped cream and toffee bits, if desired.

Tips:

*Canned dulce de leche can be found in the Latin section of well-stocked supermarkets. Nestle makes it.
*If you double the recipe for the filling, you will likely have enough to fill three deep dish frozen crusts. With one pie, you might have a little bit extra filling, depending on the size of your pie pan.